Make Art, Not Waste!
The moon glows over a sparkling lake. The ocean reflects the smudged colors of a sunset. A silent, snowy landscape glitters under the stars. Open up one of Elise Row’s old Badger tins, and you’ll be transported to a miniature world—intricately crafted in wax.

There’s a special creativity and joy in reusing packaging, turning the old into something new—whether it’s using Badger tins for storage or turning the tins themselves into art. “I think it is wonderful to see artists repurposing waste in any way,” says Elise, who works across multiple mediums and has also taught elementary school art for 8 years. “I believe that we are all born artists, and we continue to be as long as we are making art.”
The magic of encaustics
The type of art Elise creates is called encaustics. It’s a medium that dates back to ancient times, when wealthy Roman-Egyptians would have encaustic portraits commissioned of themselves in their prime years. When they passed away, the portraits would be affixed to their mummies.
While encaustics haven’t been widely used for thousands of years, the form is experiencing a renaissance. Elise first stumbled upon the medium herself after attending a workshop with artist Hélène Farrar hosted at Haystack Mountain School of Crafts. She says she immediately fell in love. “I got myself a hotplate, a heat gun and some materials to get started with, and have been working primarily in this medium ever since.”
In Greek, the word enkaustikos means ‘to burn in.’ The waxy mixture is a combination of beeswax and pigment, with tree resin added to make the beeswax more durable, transparent, and light refractive. Artists use heat to melt, paint, and carve the mixture in layers. Elise says the medium “can be sculptural, but also has colorful, more two-dimensional qualities”—almost a fusion of painting and sculpture. She says, “Encaustics connect me with nature; the smell of the melting beeswax is intoxicating to me. And the ability to layer, carve, melt and collage gives me plenty of room to explore and grow.”

A tiny world in a tin
Elise first had the idea to repurpose Badger tins while attending an online studio session with other art teachers in Maine, hosted by the Maine Arts Leadership Initiative. The topic of the open studio was Tiny Container Art / Assemblage Collage in the Miniature. While searching for a container for a mixed media collage, she came across an empty Badger tin and decided to create her piece inside, using the clear encaustic medium as a way to affix and layer her collected materials.
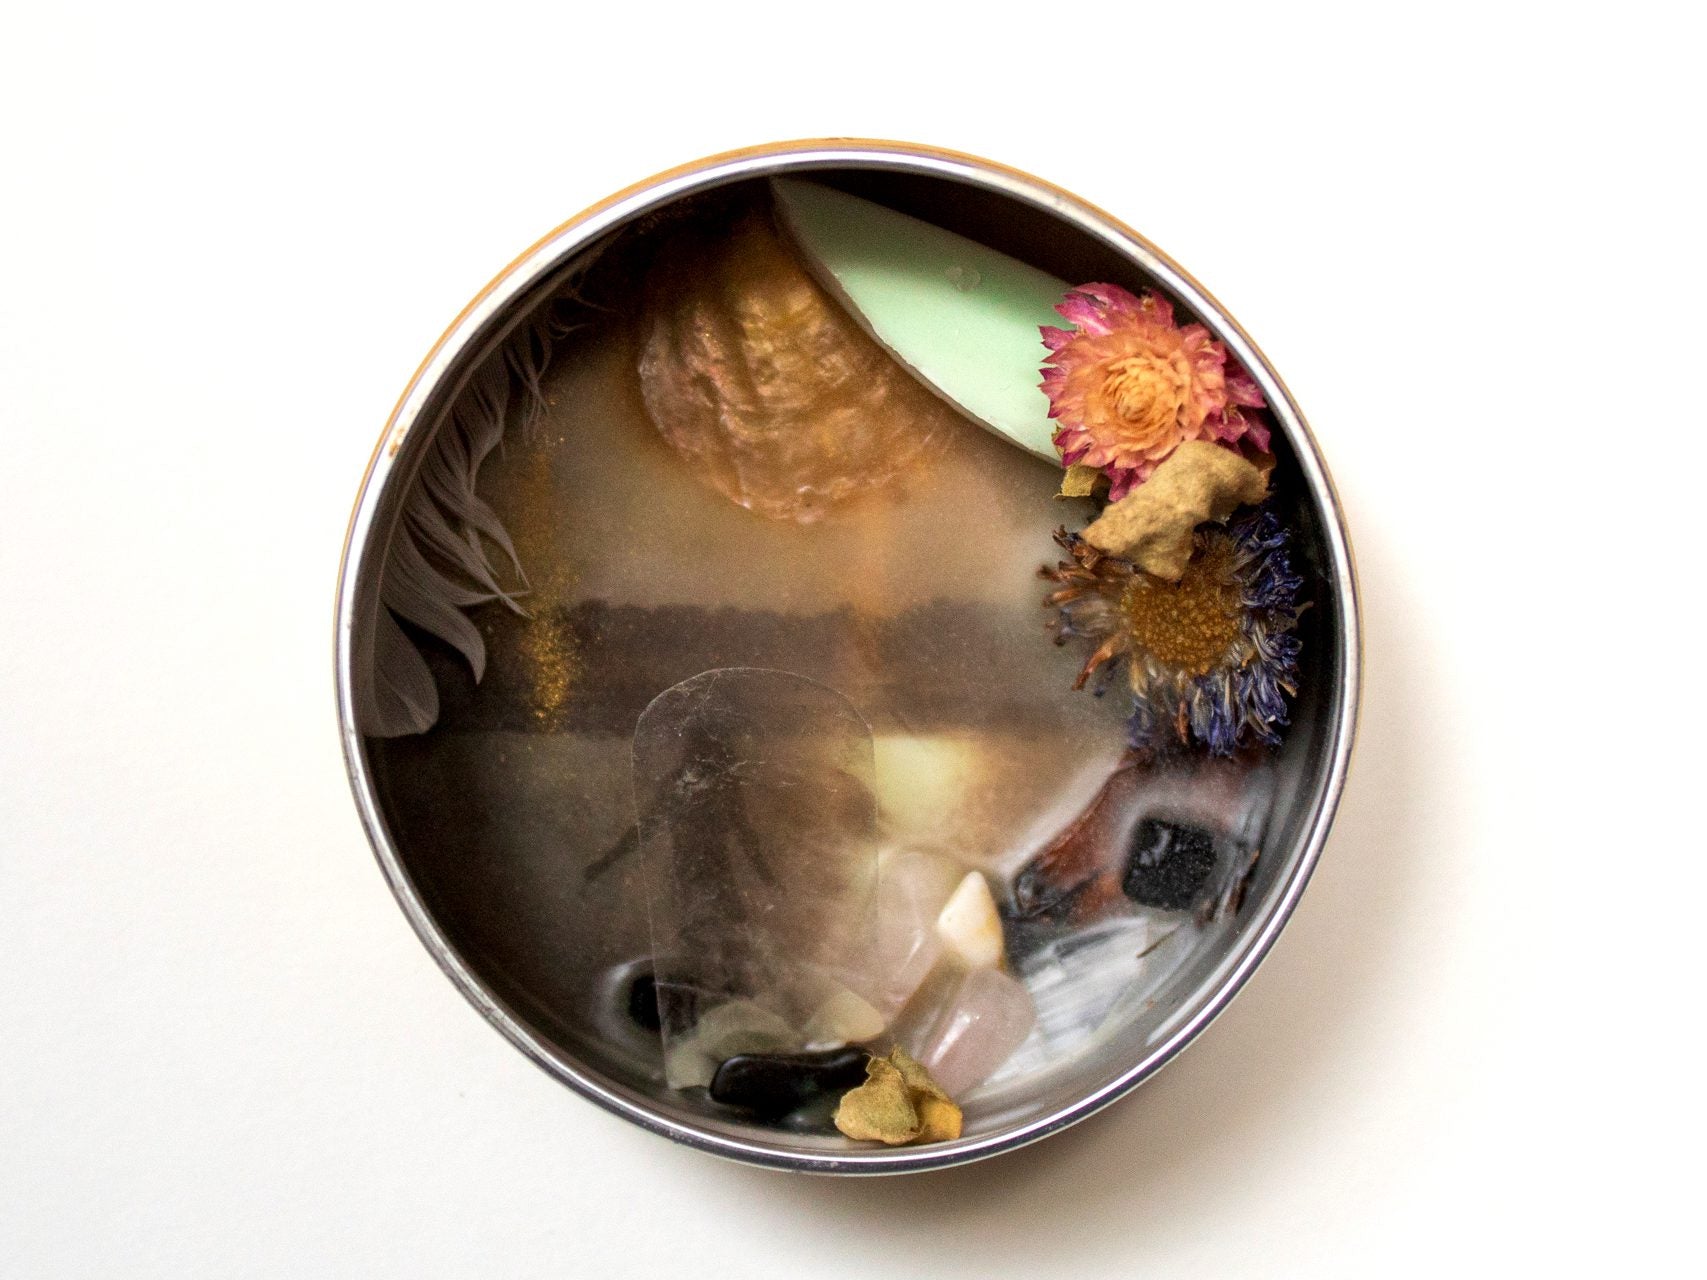
After finishing the project, she was inspired to start using her other empty tins as canvases for encaustic paintings. “I’m aesthetically drawn to the circular canvas the tins give me, and I love creating miniature pieces because I can use minimal materials and finish paintings more quickly,” she says. She often turns her finished encaustics into magnets to give as gifts to friends and loved ones, noting that “Badger tins work perfectly because the magnets stick to the back without the need for adhesives.”
In addition to creating art with her tins, Elise also uses them on her hotplate to mix and melt different colors of encaustic wax. “An ideal melting container should be completely flat on the bottom to maximize contact with the heat source,” she says. “Tin cans don’t work as well as sturdy Badger tins, and the tin containers sold for encaustic art can be pricey. The lids work great as mini palettes for color mixing, and the bottoms are great for mixing up a small amount of a color to work with.”

Reimagining waste
Elise is passionate about sharing her love of creativity. She initially studied sculpture at the Maine College of Art, where she experimented with metalsmithing, bronze casting, and figural, stone, and steel sculpture. She preferred working primarily with natural materials and taught herself how to create sculptural and wearable pieces from felted wool. Later, she decided she wanted to work with children, so she went back to school for her Master of Arts in Teaching.
“I tell all my students that they’re artists,” says Elise. “As we grow, some people either get discouraged or decide they aren’t interested in creating, and that’s okay. But I challenge any adult who says they ‘aren’t creative’ to ask themselves if they ever sing, dance, garden, or craft. There are so many ways to practice art.”
When asked if she has any advice for artists seeking beauty in so-called ‘trash,’ Elise suggests keeping your eyes and mind open. “If you don’t know where to start, look around to see what you already have,” she says. “With a creative mind, the possibilities are endless.” And if you’re just starting to experiment with finding your creative side, repurposing a Badger tin is a great place to start.
Check out Elise’s art and connect with her on Instagram at @e.row.art.

TRY IT YOURSELF
Elise has created a simpler way to try encaustics at home by reusing more waste – broken crayons!
You will need:
- A clean, empty Badger tin (top or bottom is fine)
- Peeled crayon pieces
- A baking sheet
- Tinfoil or parchment paper
- A stove or toaster oven
Instructions:
- Preheat your oven to 150F (if your oven doesn’t go that low, 200F is the max temp before the wax will start to burn off, creating more fumes.)
- Put the tinfoil or parchment paper onto your pan.
- Break and arrange your crayons in your Badger tin.
- Bake at 150F for 15 min if you'd like your crayons to be fully melted.
- Remove from the oven and let cool, or add more layers of crayons and put them back in!
You can try:
- Swirling the melted wax with a toothpick to create marbled effects
- Carving into semi-hardened wax
- Adding collage materials
- Using a hair dryer to melt the wax in the tin in a more controlled way
- Or even heating an empty tin, taking it out, and carefully painting with bits of crayon directly into the tin.
Note: Because the wax in the crayons shrinks as it dries and cannot absorb into the tin, you may be able to tip the cool tin over to pop out your finished piece. You can use this to your advantage to make many pieces of art from one tin!